Importing Content ID: DBT-CW-IMP
Marketpath CMS provides a way of importing various types of data into a site. You can import CSV data, custom packages or modules, or an entire site.
Importing CSV Data
Importing from a CSV file has very strict requirements. There is no column mapping interface so you'll need to make sure your columns are named the same as the the object field names in Marketpath CMS.
Import Calendar Events
In this example, we will import a list of calendar entries into a calendar named Events. The source data come from a CSV file.
1) Save your data into CSV file. The following fields will be imported. Fields with an asterisk (*) are required. The field names should be placed in the first row. The start and end date/time fields should be in the format "4/11/2018 3:00pm".
- CalendarGUID *
- Name *
- Title
- Timezone *
- StartDate *
- EndDate *
- Location
- Description
The CalendarGUID field should be the id of the parent calendar. You'll need to open the calendar properties dialog in Marketpath CMS to obtain the CalendarGUID value. The id will be the long hexidecimal value in the top right. Simply click it to copy. Then paste that into every row of your CSV. Your CSV file should look similar to the table below.
|
CalendarGUID |
Name |
Title |
Timezone |
AllDay |
StartDate |
EndDate |
Location |
Description |
|
0ef60d06-113c-4f0e-b981-100f2c90b355 |
Taco Tuesday |
Taco Tuesday |
America/Indiana/Indianapolis |
FALSE |
11/5/2019 15:00 |
11/5/2019 20:00 |
Bakersfield |
Party of 12 |
|
0ef60d06-113c-4f0e-b981-100f2c90b355 |
Fish Friday |
Fish Friday |
America/Indiana/Indianapolis |
FALSE |
11/8/2019 18:00 |
11/8/2019 22:00 |
Salt on Mass |
Need some Omega 3's |
|
0ef60d06-113c-4f0e-b981-100f2c90b355 |
Spaghetti Saturday |
Spaghetti Saturday |
America/Indiana/Indianapolis |
FALSE |
11/9/2019 18:00 |
11/9/2019 22:00 |
Old Spaghetti Factory |
Classics for the soul |
IMPORTANT: When importing from a CSV it is necessary that the name of the file contain the singular name of the entity type you're importing. For calendar entries, the file should have CalendarEntry in the name. This assists with the auto-definition feature. The name of the file I am importing now is events.CalendarEntry.csv.
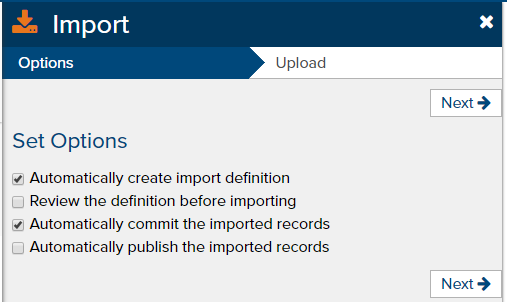
Go to Site -> Imports -> New. Be sure check Automatically create import definition and Automatically commit the imported records. Everything else should be unchecked. Then click Next. If you want to review the uploaded data and resulting data definition, you can check Review the definition before importing (resulting screens not shown here).

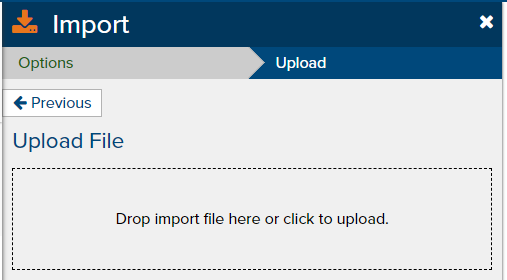
Follow the directions to upload your file.

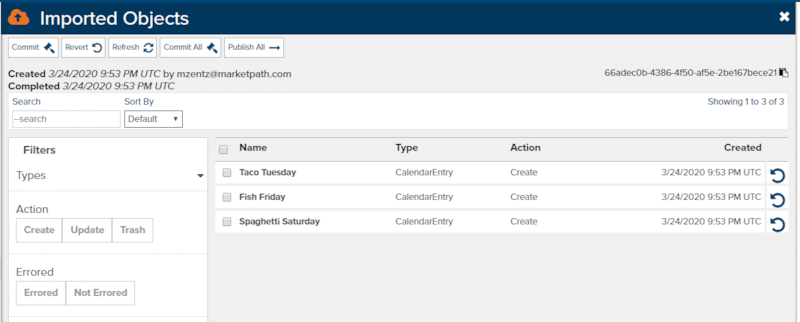
Once you have uploaded your file you'll see the following Imported Objects screen.

You have the option to revert any imported calendar entry at this point.
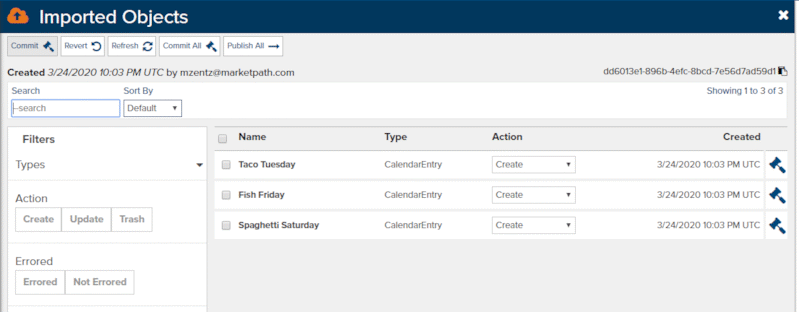
Alternatively, if you did not choose Automatically commit the imported records you will see a following dialog. Each new calendar entry will have a Create action and each existing entry will have a Update action. You can change this action for each item. Once you are satisfied with the actions for each, you can click Commit All and Publish All.

Since importing data from a CSV can be tricky and the required fields for each may not be fully understood, please do not hesitate to submit a support ticket requesting assistance with this.
Importing a Package
To import a package, you'll follow similar steps as the above example. The biggest difference is that you'll be importing a JSON file that already contains the definition or a zipped file containing the same JSON file with images and documents. You should not have to edit the definition unless you want to check for duplicates handling.
Importing a Full Site
To import a full site, the import process is simlar to importing a package. The biggest difference is that you will want a brand new site with nothing in it. Otherwise you could have some ugly collissions or duplicates that cause template rendering to fail.
Feedback?
Please fill out the form below with your feedback or any questions you may have after working through the "Importing Content" lesson.