Adding Domains ID: DBT-GS-AD
NOTE: Before you can add a custom domain name, be sure you can validate ownership of the site by having access to the domain's DNS or the ability to add a meta tag to the current website header.
Add a Domain to a Site
To add a domain to a site go to Site -> Site Administration (Fig. 1).
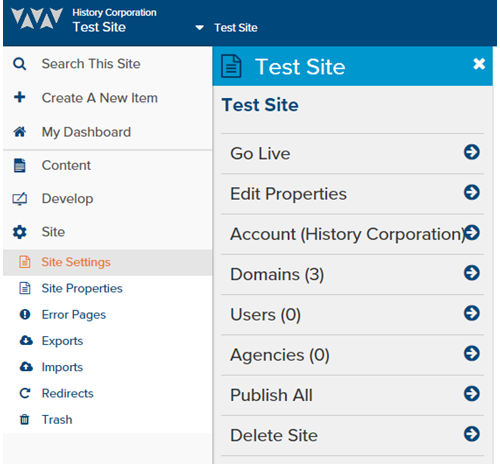
Figure 1 - Site Settings dialog
Now click Domains and then click Add Domain (Fig. 2).
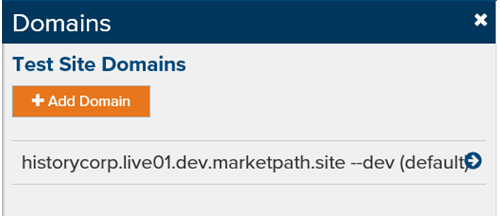
Figure 2 - Domains dialog
This will bring up the Add Domain to Site dialog. Here you'll have two choices - User a free development domain (the quickest way to get started) and Create a custom domain (which requires validation).
Add a Free Development Domain
Adding a free development domain is the quickest way to get a site up and running because you don't have to verify the domain. You can always change this later by performing a site domain swap.
To add a free development domain, click Use a free development domain (Fig. 3). Then fill in the Free Development Domain text box with a unique value related to your website's purpose. If that sub-domain is available then you'll see the Available status appear and the Save button become enabled. Click Save when completed.
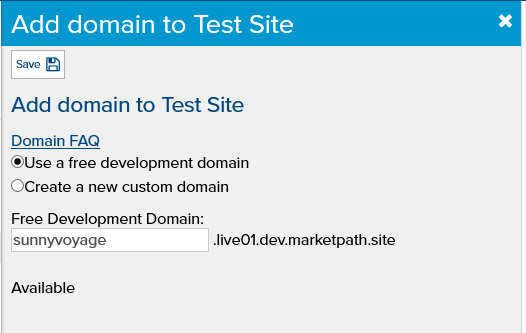
Figure 3 - Add domain - free development domain
Add a New Custom Domain
To add a custom domain, click Create a custom domain (Fig. 4) and type your full domain name (e.g. "www.mydomain.com") into the Custom Domain text box. When you're done typing, your domain will automatically be checked for availability and for any previous verification. If it is new you will be required to verify it.
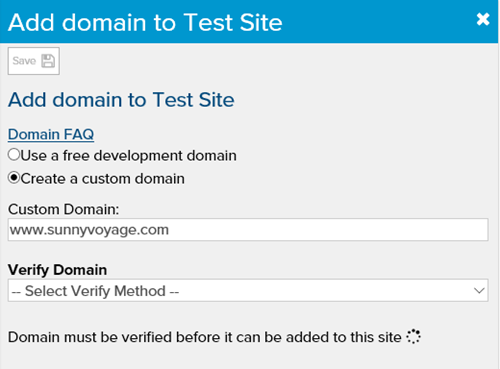
Figure 4 - Add domain - custom domain
Now, select a Verify method. You may choose from one of three verification methods:
- DNS: Add a TXT record
- DNS: Add a CNAME record
- HTTP: Add a Meta tag
Once selected you will see the instructions for whichever method you choose (Fig. 5). Keep in mind that DNS changes may not fully propagate to all of your domain's name servers, so give it a couple minutes (or possibly longer) before you click the Verify Domain button.
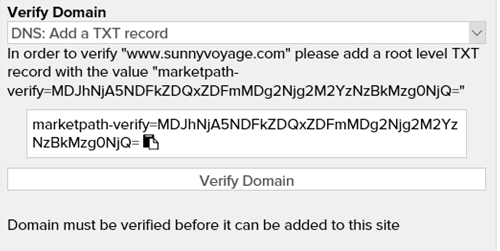
Figure 5 - Verify Domain instructions
Once you've completed the instructions and are confident the change has fully propagated, click Verify Domain. If the domain is verified you'll see the message Domain verified successfully!
A checkbox will appear asking if you want to create a redirect for the root or www version of the domain, depending on which you've added. We recommend doing this. If you added mydomain.com, for example, it will ask you to create a redirect for www.mydomain.com. Check the box and click Save to add the domain and the redirect to your site.
Redirect domains are free to add. Additional custom domains that are not redirects may incur an additional monthly fee, depending on your site plan.
Setting a default domain
Once you've added a domain to a site we recommend setting it as the default domain. In the Site Domains dialog, click the new custom domain and then click Make Default. All newly created pages will then default to this domain. To update all existing URL's you'll need to perform a Site Domain Swap. This is explained in a later lesson.
Domain properties
While in the Site Domains dialog, you can click each domain and make adjustments to it (Fig. 6). There may be a note explaining that the domain is not resolving to the correct endpoint (i.e. CMS Live Server). You'll need to fix this before you can open your site using the custom domain.
You can also change SSL settings from this dialog. Here you have three options.
- The free SSL certificiate will be auto-generated after the site goes live. Set the domain to Either (default) or Require. This may take up to an hour to complete after go-live.
- You can complete additional domain validation for the SSL provider by clicking Start Validation and following the steps indicated. This is different than verifying the domain for Marketpath CMS.
- You can upload your own SSL certificate by clicking Add Custom SSL Certificate.
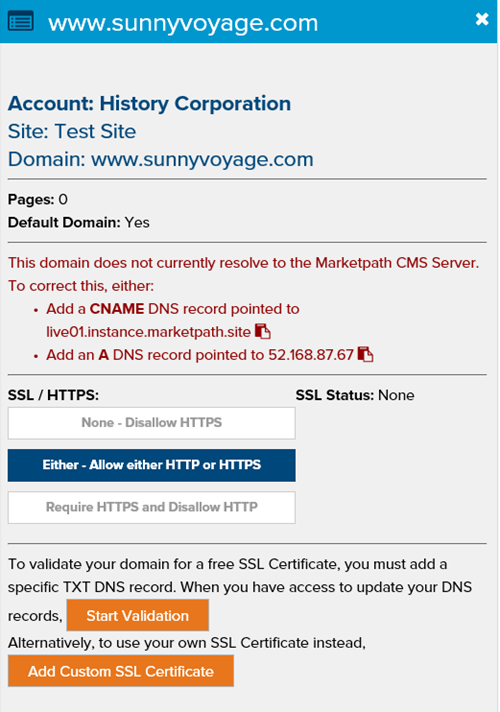
Figure 6 - Site domain properties dialog
Adding a Domain to an Account
All domains are tied directly to the account used by the site. But you can also add domains directly to an account by clicking the upper-right cog icon and then Accounts. Select the Account you want and then click Domains. The process of adding a domain is similar to the steps above, except you cannot add a development domain and it will not be associated with a site when completed.
Once added, you will be able to add that domain to any sites within the same Account.
Verified Domains
Once you verify a sub-domain like www.mydomain.com, the parent domain will be added to the verified domain list for your account. Any subsequent domain additions will bypass the verification process altogether and allow you to quickly add more sub-domains.
Feedback?
Please fill out the form below with your feedback or any questions you may have after working through the "Adding Domains" lesson.