Publishing & Unpublishing ID: EBT-CECP-PUB
In Marketpath CMS, if you want something to show up on your Live website you will need to publish it. This is different than our Preview server where you can view your changes immediately after saving the content.
When you publish one or more items you will see the activity icon appear in the top right corner of the screen (Fig. 1). Once the publish operation has completed it will turn green (Fig. 2).
![]()
Fig. 1 - Activity icon during a publish operation
![]()
Fig. 2 - Activity icon when publishing has completed
If you are publishing many items at once you can check on the progress of each by clicking the activity icon. This will show all recently completed activity, any failed actions, and any in-progress actions (Fig. 3).
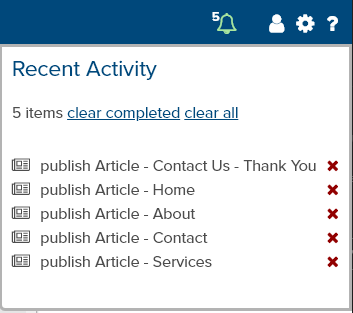
Fig. 3 - Recent Activity dialog
Publishing An Item
When you have an item open in the Properties or Edit Page view you will see a Save and Publish button in the toolbar at the top (Fig. 4). Click this button to publish the item. Watch the activity icon at the top right to see when the publish action has completed.
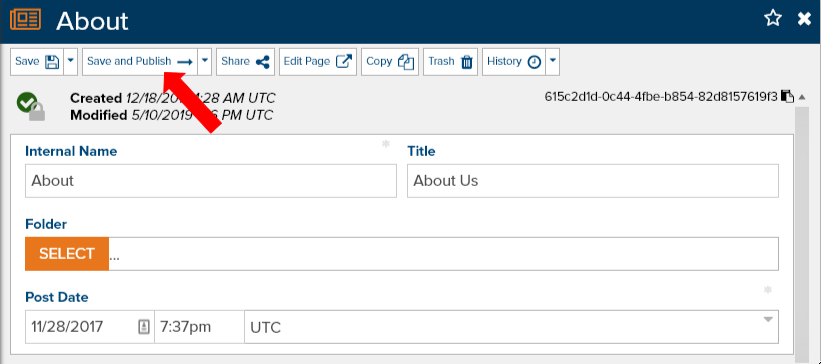
Fig. 4 - Save and publish button
Publishing Multiple Items
To publish multiple items at the same time you must be in a list view. You can select items one by one by clicking each checkbox or you can select all items in the current list by clicking the select all checkbox (Fig. 5). Once the correct items are selected click the Publish button.
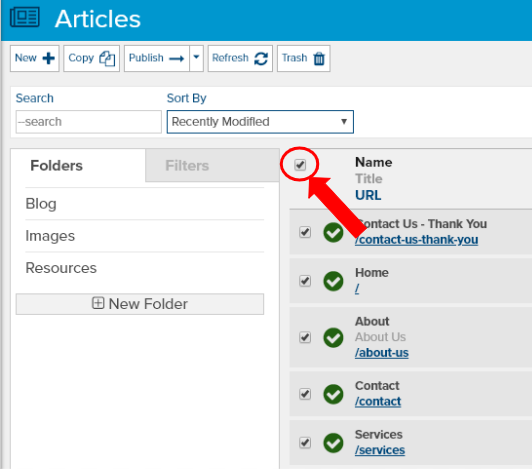
Fig. 5 - Select all checkbox
Unpublishing An Item
Unpublishing an item removes it completely from the Live website. It does not delete or trash the item from the Manage environment.
To unpublish one or more items, you’ll need to click the small down arrow to the right of the Publish button. This will show a menu with the Unpublish action (Fig. 6). Click Unpublish and your item will be removed from the Live website. Just like regular publishing, you will see the animated Activity icon while the unpublish operation is processing.
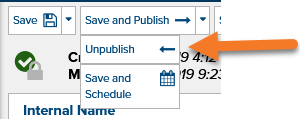
Fig. 6 - Accessing the Unpublish action
Unpublishing Multiple Items
Unpublishing multiple items is accomplished the same way as publishing multiple items. Simple open a list view, select one or more items by using the checkboxes, access the additional publishing actions by clicking the down arrow, and then click Unpublish.
Unpublishing a Parent and its Children
Several objects within Marketpath CMS are parents to other objects. For example, a Blog is the parent object of Blog Posts. A Calendar is the parent of Calendar Entries. Datastores are the parent of Datastore Items. And a Folder is the pseudo-parent of all objects within it, including sub-folders and the objects within those.
When you unpublish a parent object, all children of that object will also be unpublished. So be careful what items you unpublish.
Scheduled Publishing & Unpublishing
Scheduled publishing allows you to set a future date for content to be published. This is extremely helpful if you have a lot of content that you want to publish over multiple dates. An example is when you’ve had multiple Blog Posts written or provided for you and you want to schedule each a couple days apart.
To schedule a publish action, click the down arrow at the right of the Publish button (or the Save and Publish button if you’re in Properties or Edit Page views). Then click Save and Schedule (Fig. 7).
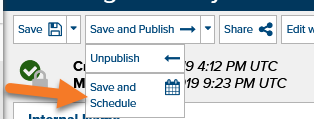
Fig. 7 - Scheduled publish button
This will open the Schedule dialog (Fig. 8).
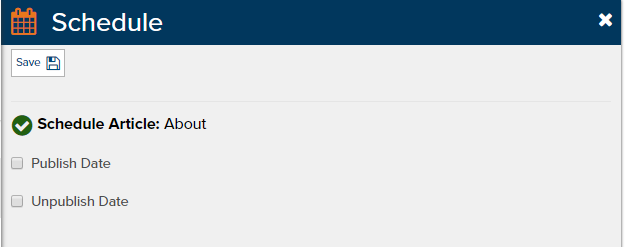
Fig. 8 - Schedule dialog
If you want to schedule a publish action, then click the checkbox next to Publish Date. If you want to schedule an unpublish action, then click the checkbox next to Unpublish Date. For each, fill in the appropriate date and time of the action (Fig. 9). The time zone should be set to your site’s default time zone but you can change it to any time zone.
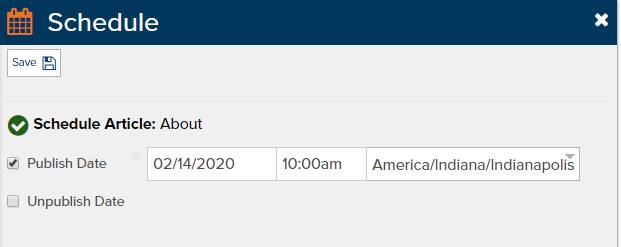
Fig. 9 - Setting a scheduled publish date and time
Another way to think of the scheduled unpublish action is like an expiration. When the time hits the item will be removed (or expired) from your website.
Status Icons
Marketpath CMS contains status icons for items in many different dialogs. Here’s a breakdown of what each type of icon or indicator stands for.
|
|
|
|
|
|
|
|
|
|
|
|
|
|
|
|
|
|
Feedback?
Please fill out the form below with your feedback or any questions you may have after working through the "Publishing & Unpublishing" lesson.