Creating Links ID: EBT-EDIT-LNK
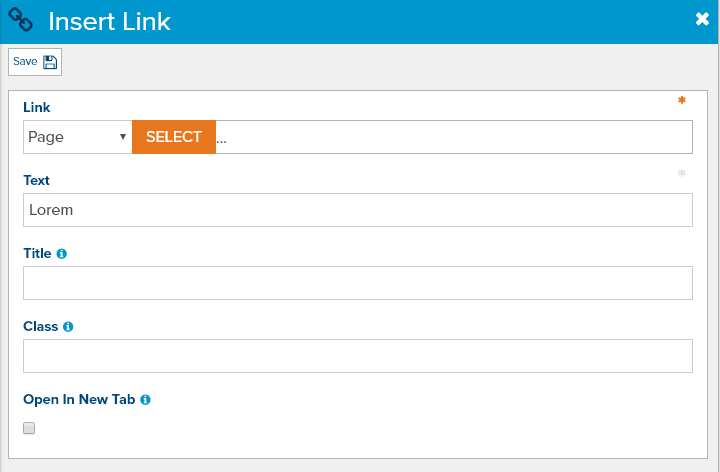
When you are ready to link to another page, document, image, email, or some external URL, select the text or image you want to link and then click the Link button. Alternatively, you can press CTRL + K or Command + K (for Mac). This will open the Insert Link dialog (Fig. 2).

Fig. 1 - Insert Link dialog
Link Types
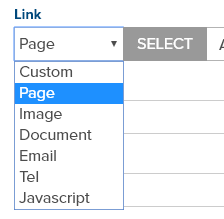
There are several link types you can select from the Link drop down field (Fig. 2)

Fig. 2 - Link types
Page (Default)
The default option is for linking to a Page. Click SELECT and the Select Content dialog will appear showing all available items that have a page (where Has URL property is set). Click the page you want and then click Save to insert the link.
Custom
The Custom option is selected if you want to link to external websites. Simply provide the URL in the adjoining text field and click Save.
Image
The Image option is selected if you want to link directly to an image. Use this option if you are showing an image thumbnail and want to give the user access to a larger version of the image.
Document
The Document option is selected if you want to link to a document (Fig. 3).

Figure 3 - The various options for selecting a document as a link (nearly identical to selecting a page / image)
Select the Email option if you want to link to an email address. You will be asked to provide the email address, a subject, and a body. Email address is the only field that is required.
Note that when a visitor clicks on an email link it will attempt to open a new email message from their operating system’s default mail program. For Windows, this is typically Outlook or Windows Mail App. For Mac it may be the default Mail client. However, some visitors may not have these applications setup and may use web-based email instead. It can create a confusing process for many users.
Instead, you might ask your developer to allow visitors to copy the email to the clipboard or open a contact form that emails the recipient directly. Simply inserting an email address link is an old practice that still works but it doesn’t present the best user experience for website visitors.
Tel
Select Tel if you want to setup a phone number link. This is most helpful for visitors using a mobile device. When the phone number is clicked they will be immediately prompted to make a phone call to it.
Javascript
This is for advanced users and allows custom Javascript code to be executed when the link is clicked.
Text
The Text field shows the text that you’ve selected before clicking the Insert Link button. You can change this value and it will update the selected text in the HTML editor.
If this field appears empty then the full URL will be inserted at the current cursor location in the HTML editor.
If you are adding a link to an image, this field will not be displayed in the Insert Link dialog.
Title
The Title field allows you to provide more information about the link. This is a common practice if you are adding an image link. Do not use the Title field if you are simply repeating the selected text.
Class
Class can be used if your developer provided you with specific classes that style a link in a certain way. For example, if the “button” class is available the link will appear like a button. You can typically ignore this field.
Open in New Tab
If this checkbox is selected and a website visitor clicks the link the linked page will open in a new tab. This is highly recommended for links to external sites. When used properly, the visitor can go back to your site because the tab for it is still open.
Feedback?
Please fill out the form below with your feedback or any questions you may have after working through the "Creating Links" lesson.