Working with Blogs ID: EBT-WWC-BLOG
Marketpath CMS Blogs are one of the most important features for effective content marketing. Most blogs are written in a simple, conversation tone eliminating the need for strict editing and review but that may not be the case for everyone.
The first thing to understand is that Blog Posts belong to a Blog. When you navigate to Content -> Blogs you are only seeing a list of the Blogs, the parent object of Blog Posts. To see individual Blog Posts for a particular Blog you need to click the right-facing Browse arrow (Fig. 1).

Fig. 1 - Blog list dialog designating the Browse action
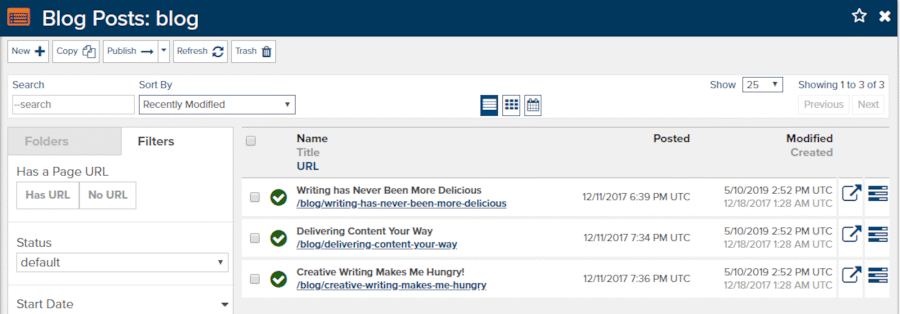
Once you click the Browse button, you will see a list of Blog Posts (Fig. 2).

Fig. 2 - Blog Posts dialog
Creating a New Blog Post
While in the Blog Posts dialog you can edit existing Blog Posts by clicking the Edit Page icon ![]() or clicking on the Properties icon
or clicking on the Properties icon ![]() .
.
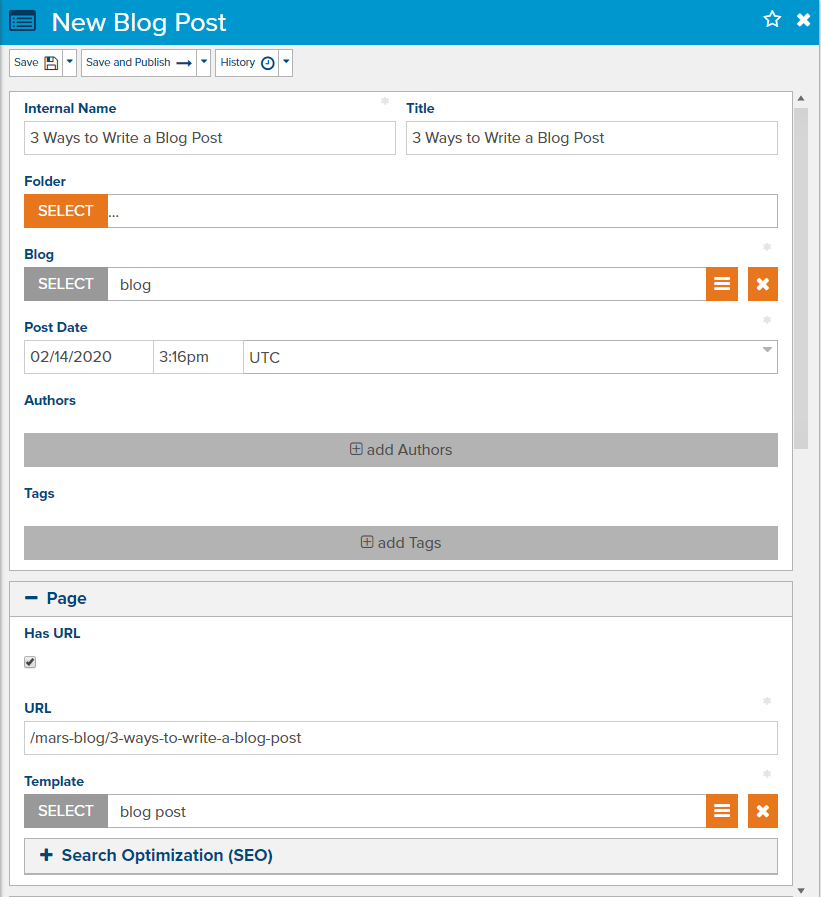
To create a new Blog Post click the New button and the New Blog Post dialog will open (Fig. 3).

Fig. 3 - New Blog Post dialog
Provide an Internal Name and a Title for your Blog Post. In most cases, these will be the same unless you have a special format for the internal name. The Title will appear on the website, so it is important to make it an engaging headline.
The parent Blog should already be selected but if not, select it here.
The Post Date is meant only for showing posts in a chronological order or for visitors to see when the Blog Post was first posted. This date has nothing to do with publishing. That is, if you set this to a future date and click Publish the Blog Post will become visible immediately on the website. Instead, use Scheduled Publishing.
One more thing about the Post Date. The time zone will default to your site’s time zone. We recommend leaving this alone. If the time zone is not correct then you’ll need to adjust that in Site -> Site Settings -> Site Timezone.
We recommend adding Authors even if they aren’t displayed with the Blog Posts on your website. This will help you organize internally for the time being but provides the option to display Authors in the future and even build custom Author pages showing all their content.
Tags are not required but should be added for every Blog Post and should follow your specific Search Engine Optimization strategy.
The Summary field is often used on websites to show a short summary of the Blog Post along with the Title. If your site does not display this field on the website we still recommend providing a concise overview. This field allows rich text editing but our advice is to stick with plain text unless your developers instruct you otherwise.
The Content field contains the main content of the Blog Post and can be as long as you’d like.
One final recommendation is to open the Search Optimization group (Fig. 4) to adjust your Browser Title and add a Meta Description. These two fields are what appear in on-site search as well as in Google or Bing searches. The Meta Description can be the same as your Summary field if you want to keep it simple.

Fig. 4 - Search Optimization group. Be sure to review the Browser Title and fill in the Meta Description
Feedback?
Please fill out the form below with your feedback or any questions you may have after working through the "Working with Blogs" lesson.