Adding a new package to your site ID: PM-IP-AP
While adding a new package to your site sounds relatively simple and straightforward, there are a number of factors that can make it more complicated. Knowing these in advanced can also help you have the best experience with packages possible.
Installing a Package
1. Open Site Packages
To install a package on Marketpath CMS open the side menu. If it is visible, select "Site" => "Site Packages". If the "Site" menu is not visible, select “Full Menu” at the bottom. This will open the menu shortcut interface. Click “Site Packages” under “Site”. Additionally you can select the star to create a shortcut to Site Packages in the side menu.


The site packages dialog allows you to manage currently installed packages and install new packages. To install a package click “Add Package”.
2. Find a package
Browse for a package you would like to install and select it (you can click “Properties” to read more details about a package). Once you have selected one or more packages than you are ready to begin the installation.
3. Begin package installation
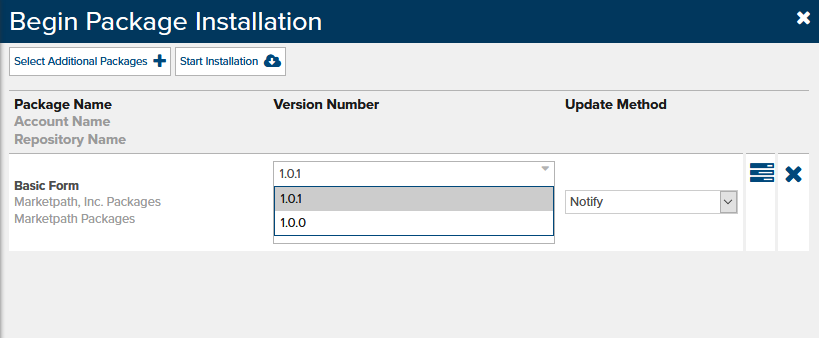
The Begin Package Installation dialog shows you the version of any packages you are about to install. You can select other versions in the dropdown. The update method allows you to choose what happens to the package on your site when a new package version is released. This will be covered in more detail later, but the options are:
None - does nothing (updates can be manually installed on the Site Package dialog).
Notify - sends an email to the site admin.
Auto - automatically updates the package files on the site with the new files.
Click “Start Installation” when you are ready to move onto the next step.
A couple of things will happen when you click this button before you will be allowed to move on:
- You will be prompted to add any dependencies that also need to be installed along with any of the packages that you have selected.
- You will be prompted to accept any terms & conditions for the packages that will be installed.
Once that is done, you will be redirected to the Package Installation dialog.
4. Package Installation
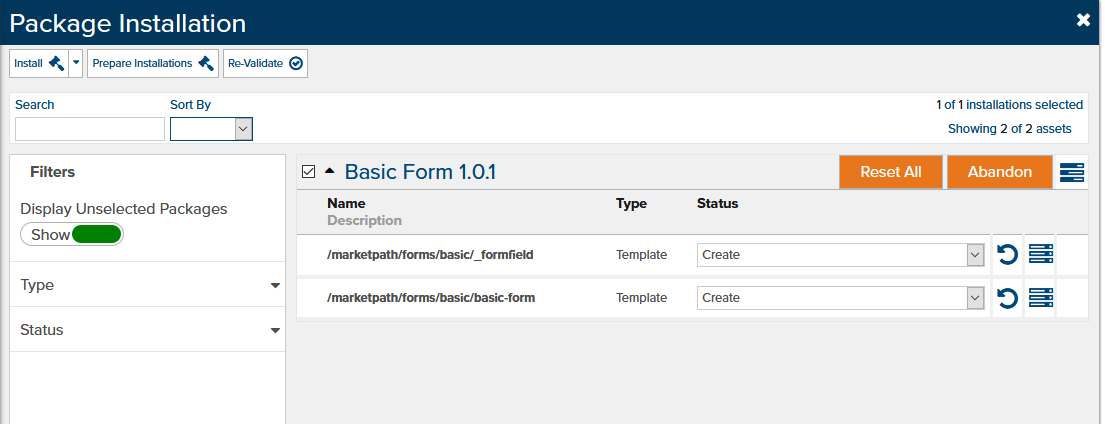
This screen is primarily for more advanced users. You can often skip this screen and keep with the default package configuration settings by clicking “Install”. However if you would like to customize your package or resolve errors then this is an important step, which we will cover in more detail in the next lesson.
This dialog breaks down all of the files and entities that the package will create on your site. The status controls what will happen to the file when you install it:
None - This file will be skipped. If other resources depend on this item then it may cause errors and you should map it.
Create - The file will be created (this is normally the default behavior).
Map - This skips creating the item and instead references a resource you select in its place. This is useful if the file or entity already exists on the site under another name.
Your progress is currently saved so if you exit this step you can get back there by going to the first screen (you may need to refresh), “Site Packages” > then selecting “Continue Installation”. If you would like to quit installing this package and remove any saved progress then select “Abandon”.
When you are ready click “Install” and the package resources will be installed to your site. You can publish all the files at this point if you want them to be public. You may need to perform additional steps to set up the specific package. Each package is different and you should consult the package instructions for details.
Feedback?
Please fill out the form below with your feedback or any questions you may have after working through the "Adding a new package to your site" lesson.